Usually, opening the Snipping tool is just a search away in Start Menu of Windows 8 or 10. But in new laptops/notebooks with SSD where Windows 10 indexing service is disabled by default, searching the Snipping tool doesn’t come out with the appropriate result. If you have an SSD in your laptop, do check if Windows Indexing Service is turned OFF or it’s working. To prolong the life of SSD in your computer turns out to be the only reason for turning OFF Windows Indexing Service in Windows 10.
How to Open Snipping Tool in Windows 10 Plus Tips and Tricks
So, to restore faith in Windows 10 search, you need to enable Windows indexing service. To do so:
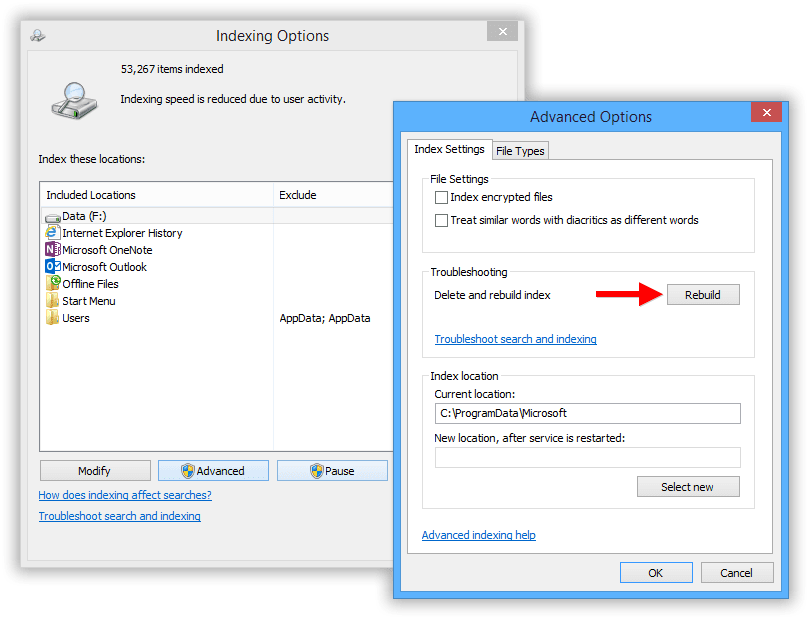
Open Control Panel > Indexing Options
Click Advanced Button, then in Advanced Options > Click Rebuild.
The rebuilding of Index can take days. But to open Snipping Tool instantaneously, following are the methods:
Way 1
Open Start Menu > Navigate to > All Apps > Windows Accessories > Snipping Tool
Way 2
Open Run Command box by pressing Windows key + R. Type in: %windir%\system32\SnippingTool.exe and Enter.
Way 3
Create a shortcut on the desktop with this path: C:\Windows\System32\SnippingTool.exe
Way 4
Open Run Command box by pressing Windows key + R. Type in: snippingtool and Enter.
Snipping Tool Tips and Tricks in Windows 10
Delayed Screenshot Mode
Previously in Windows 7 or 8, there was no way that you could take a screenshot involving mouse movements. The only way to capture pop-up menus and tooltips was through PrintScreen command by pressing the PrtScn button or combination of Alt+PrtScn on the keyboard, and pasting the copied content on paint for further processing like cropping, scaling and saving.
But, with Windows 10, Microsoft has included a new feature called Time-delay Shutter option. This option lets you take cropped or uncropped screenshots of pop-up menus or tooltips, which were not possible before. Here’s how you can use the Delay option in the Snipping Tool:
Open Snipping Tool
Click Delay and select any delay time in seconds. Currently, you’ll have the choice to choose between 0 to 5 seconds. The default delay time is 0 seconds.
Chose any delay time, select New > Rectangular Snip and open any pop-up menu you want to take a screenshot of.
Now select any type of Snip you want i.e., New > (free-from, rectangular, windows or full screen).
Free-form: It lets you draw any random shape on screen and captures the screen in same shape.
Rectangular Snip: This allows you to take a rectangular snip, created around by dragging the mouse over any area.
Windows Snip: This options lets you take a full screenshot of any object you have opened like any browser, dialog box, any file explorer windows etc.
Full Screen Snip: Upon selecting this option, as soon as you click New, it’ll take screenshot of whole screen and present it to you for further editing.
Now, you’ll have your selected delayed time to open any window, or pop-up menu or hovering your mouse to capture any tooltip. As soon as the delay time is over, the Snipping tool takes the snapshot of the full screen and activate the Snip tool you selected. Now, you cut the screenshot they way you wanted, or if you have chosen full screen, then by now, it’ll be available to you for further editing.
Open Snipping Tool with a HotKey
Since many people in the industry require to take screenshots frequently, hence having a shortcut to open such tools comes handy. Although you can create a shortcut on the desktop for that or could pin it to the Start menu, yet these requires you to move your mouse or minimizing your Window. Hence, creating a hotkey shortcut is the best option for opening such a tool. For doing so:
Right-click on Snipping Tool in Start menu.
Select Properties > Shortcut Tab
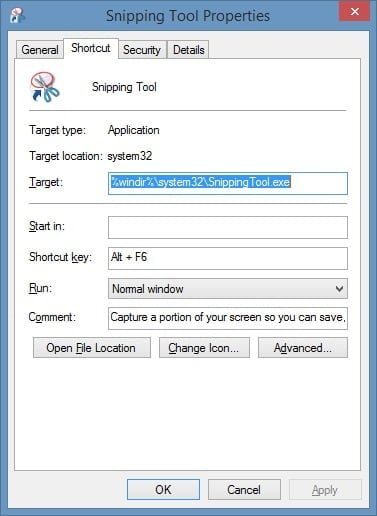
Click on Shortcut Keyspace row. Press any combination of Key to set the Hotkey. Don’t select just a single keystroke as in most laptops; every Function key is already bound with some options. Hence you can set Alt+F(1-12) except F1 or F4. Or you can also combine Ctrl+Alt+F(1-12).
Directly save a Screenshot Without Using Snipping Tool
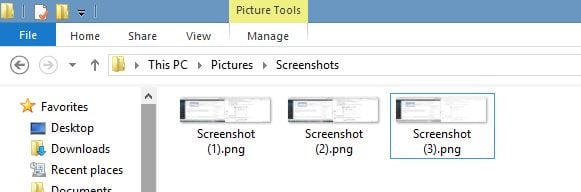
To directly save a screenshot of the current scene on your computer folder in Pictures folder, press Windows key + PrtnScr key.
Disable White Overlay When Taking Screenshots
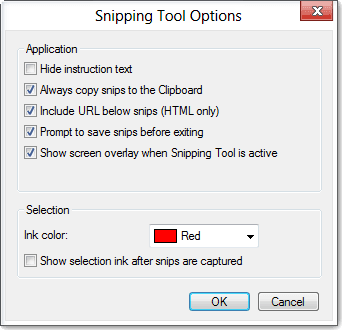
As soon as you click New Screenshot on Snipping Tool, it creates a white overlay screen to create an effect of the cut-through of your selection. However, this effect is not comfortable for many. Hence, you can disable White Overlay setting in Snipping Tool by opening Options in the tool and uncheck Show Screen Overlay when Snipping Tool is active.
Share a Snip
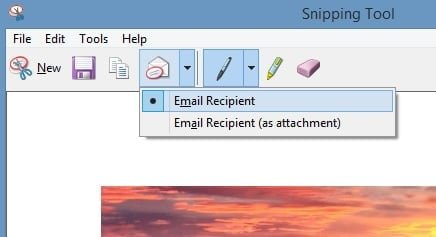
You can share the captured snip directly from the Snipping tool via email by clicking the Email button on the tool. You can choose the screenshot to be sent as inline content or as an attachment from the dropdown menu. And upon selecting the option, it’ll open for you the default email client.
Take Screenshot of Context (Pop-up menu) without Using Delay Option.
If you’re not comfortable with using the Delay option, you can take a screenshot of Popup-menu by:
- Open Snipping Tool
- Hit Escape Key.
- Open your pop-up menu like any context menu by doing right-click anywhere.
- Press Ctrl+PrntScn

- Now, the snipping tool will freeze the screen, and you can take a screenshot of your pop-up or contextual menu.
Take Screenshot of Start-menu using the Snipping Tool.
In Windows 8 or 10, where when as soon as you open the Snipping Tool, it closes the start menu and switch to desktop mode. However, there is a hack to take a screenshot of the start menu by:
- Open Snipping Tool.
- Press Escape Key.
- Press the Windows key to open the start menu.
- Press combination of Ctrl+PrntScr.
- Make the selection with the mouse, the portion of the screen menu you want to take a screenshot of.
- To capture the entire Start menu, rather than pressing Ctrl+PrntScr, press Windows key+PrntScr.
If we have missed any trick for the Snipping tool, do let us know in the comments section.
Great tips here thanks. Win 10 added an extra step using snippit. Is there a way to hit snippit tool and NOT need to hit new? Win 7 allowed you to hit snippit and automatically allowed you to grab image without extra step of hitting ‘New’ every time. Not a big deal but I take 40 images a day and gets tedious.
Thanks for any help!
Apologies to disappoint you, but I don’t have any idea either for it. Rather you should try this application. It’s free and available on Windows and Mac both – https://www.techsmith.com/jing.html
That’s what I wanted to know too, Gordon. I always use the rectangular snip and now have to click twice when before I could just click once and go. Thanks Microsoft.
Open One Note just one time. From then on out you can hit Windows + Shift + S to get snip tool open. This used to be just Windows + S in previous versions.
How to support an oem define hotkey (Fn+F7) to launch snipping tool? It needs to be ready on shipping image rather than user to set it through shortcut hotkey later individually.
Is there any scan code define for snipping tool hotkey?
Please advice it. Thanks.
Just make your own script? with AHK or something similar.
In the script, run the snippingtool.exe and then use SendKeys (in AHK) to send shortcut ctrl+n, voila.
So it’s just a modified startup of snipping tool.
add the switch /clip to the command line shortcut. This will skip having to click new and will automatically save to the clipboard but also closes any dialog box after the capture.