While Microsoft has started rolling out upgrade for Windows 7 & 8 users, so many users are still facing issue not able to get their “Get Windows 10” notification icon in their taskbars of respective windows. While Microsoft has officially rolled out Windows 10 now, and you can directly get it by using “Media Creation tool of windows 10” or can make bootable USB pen drive of Windows 10 and upgrade your PC anytime when you feel that Windows 10 is stable and safe enough to upgrade.
![]()
How to Enable Windows 10 Notification Icon in Taskbar of Windows 7 or 8.1
If you’re not able to see Windows 10 icon in your taskbar, the following could be the reasons:
- Windows Update is not set to receive updates automatically
- If above reason is true, then your system is not up-to-date with required updates which helps initiating the Windows 10 upgrade.
- Also, might be by mistake, you would have disabled or blocked the required Windows update functionality.
- You’re PC or Laptop is not running Genuine windows.
- Your PC is a part of Work domain and not the by default domain like “WORKGROUP” or “HOMEGROUP”.
- You’re running Windows Enterprise editions like Windows 7 Enterprise, Windows 8/8.1 Enterprise or Windows RT or Windows RT 8.1, these versions are actually not eligible for Windows 10 and this reservation offer by microsoft.
So, first step you need to take is enabling automatic windows updates which shall fix many reasons above. If you take steps to eradicate above reasons, you should see the icon finally. If still no luck, then try this method:
Open Notepad and copy following text into it.
|
1 2 3 4 5 6 7 8 9 10 11 12 13 14 15 16 17 18 19 |
REG QUERY "HKLM\SOFTWARE\Microsoft\Windows NT\CurrentVersion\AppCompatFlags\UpgradeExperienceIndicators" /v UpgEx | findstr UpgEx if "%errorlevel%" == "0" GOTO RunGWX reg add "HKLM\SOFTWARE\Microsoft\Windows NT\CurrentVersion\AppCompatFlags\Appraiser" /v UtcOnetimeSend /t REG_DWORD /d 1 /f schtasks /run /TN "\Microsoft\Windows\Application Experience\Microsoft Compatibility Appraiser" :CompatCheckRunning schtasks /query /TN "\Microsoft\Windows\Application Experience\Microsoft Compatibility Appraiser" schtasks /query /TN "\Microsoft\Windows\Application Experience\Microsoft Compatibility Appraiser" | findstr Ready if NOT "%errorlevel%" == "0" ping localhost >nul &goto :CompatCheckRunning :RunGWX schtasks /run /TN "\Microsoft\Windows\Setup\gwx\refreshgwxconfig" |
Save the file as EnableWin10.cmd (download from here) and ensure that while saving the file, you choose “Save as type” to “*.*” or it’ll get saved as a text file. Let’s save this file to C:/Temp folder. If folder is not available, create it and save.
Now open start menu, type “cmd“, in search results, right click on “Command prompt” and click “Run as Administrator“. Now run following command in it:
|
1 |
C:/Temp/EnableWin10.cmd |
What this shall do, that it’ll force activate Microsoft Compatibility Appraiser and this can take even 10-30 minutes to run, so you just need to be patient and keep continuing your work on PC if doing any.
If you find the script running in an infinite loop, that means you have not updated your PC/Laptop with necessary prerequisite Windows Updates. So, along with automatic updates, you need to ensure that you have following updates in your PC:
For Windows 7 SP1:
- KB3035583
- KB2952664
and for Windows 8 or 8.1:
- KB3035583
- KB2976978
To check if you have these updates or not installed in your device, you can run following command in command prompt with administrator access:
For Windows 7 users:
|
1 2 |
dism /online /get-packages | findstr 3035583 dism /online /get-packages | findstr 2952664 |
and For Windows 8 users:
|
1 2 |
dism /online /get-packages | findstr 3035583 dism /online /get-packages | findstr 2976978 |
If you have updates installed, it should result similar to following context like if i run as a Windows 8.1 user:
|
1 |
dism /online /get-packages | findstr 3035583 |
then output should be like something this:
Package Identity : Package_for_KB3035583~31bf3856ad364e35~amd64~~6.3.1.29
Ensuring that you have above updates installed, you will get the icon for sure. If don’t find the packages installed, you can install it by youself from following direct links and try running the EnableWin10.cmd file again:
Windows 7 x64
Windows 7 x86
Windows 8.1 x64
Windows 8.1 x86
While Solution 1 should work for most, if not, then here is another method to tackle this issue:
- Download this win10fix_full.zip file.
- Extract the file somehwere in Desktop or any place you like.
- Right click on it and click “Run as Administrator”.
 Follow on screen instructions to reach this menu as shown above. Select 1 to check if you have the necessary updates.
- Then Select 2, which within a second, enable “Get Windows 10” notification icon in taskbar.
- If not, then you can also try option 3 or 4 which takes longer times for icon to show up. But eventually any of the option should work for most users.
What these options does is:
- Option 2 check and updates the registry, which works for most cases.
- Option 3 does the GWX task, hence usually it can take upto 10 minutes before the icon may appear.
- Option 4 can take upto 10 to 40 minutes and if it gets stuck in a loop for a very longer period, you might can be out of your luck.
For many users, they don’t have KB2976978 update missing in windows update list. Searching in WindowsUpdate log file from another PC provided a direct link to the .msu file. All you need to install this missing update and the GWX program shall run successfully, resulting in appearance of “Get Windows 10” notification icon.
To get that update. open this link (http://catalog.update.microsoft.com/v7/site/Search.aspx?q=2976978) in Internet explorer as it shall not work in any other browser. You might be asked for installing an ActiveX control, do that.
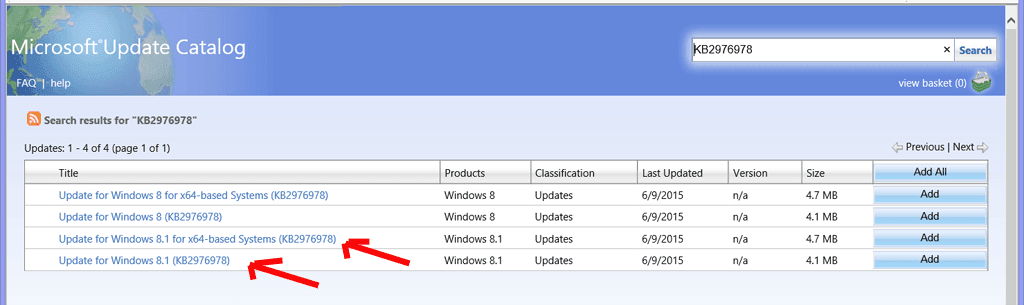
- Now, add either the 32bit or 64bit update (the one with latest updates) to your basket and then view Basket. Follow the steps to download the update to your computer. You’ll find a folder with 2 files in with i.e. an .exe and a .msu file.
- Run the .msu file and reboot when it ask for it.
- Now, go back to Solution 2 and run that .bat file again and test which method now works for you again.
Although this method has least chances, yet you can give it a try.
- Go to Control panel -> Administrative Tools -> Schedule Tasks
- Task Scheduler Library -> Microsoft -> Windows -> Setup – GWXTriggers,
- Select refreshgwxconfig-B and run it.
Hope you find these solutions useful. Do let us know in comments, which method worked for you.
Thank you – Solution 2, option 2 seems to have worked for me! I’ve got the same Windows icon in my laptop start menu as appeared automatically on my PC anyway.
That’s awesome Kerry, that my provided solution worked for you. Thank you so much for your feedback.