Use of ESD files started when Windows 10 Technical Preview were upgraded to a new build using PC settings Download and install method. This way, Microsoft uses ESD files (Electronic Software Delivery) to deliver install files required for upgrade to next build of Windows 10 technical preview. Usually an install.esd file contains install.wim (Windows imaging) in a encrypted and compressed form. And install.wim have all the files which is required to complete a Windows installation. Using this tutorial, you’ll be able to make a bootable ISO file from install.esd file which further can be used to burned to a DVD or for making a bootable USB for upgrade or clean install of Windows.
ESD To ISO – Create Windows 10 Bootable ISO from ESD File
So, here’s what we need to do:
- Check in Windows update if you’re on latest build and then you have latest install.esd file.
- Download ESDtoISO tool from here. This tool is based on ESD Decrypter V3. Script credit goes to Mr. Kari who made this script and shared it with public.
- Unzip the respective file (applicable to your current windows build) to any folder of your choice at any place.
- Now copy that install.esd file you have to the folder where you extracted files of ESDtoISO zip file.
- Right click on ESOtoISO.cmd file and “Run as Administrator“. This command shall automatically find the ESD file in your folder and present you with a choice of commands:
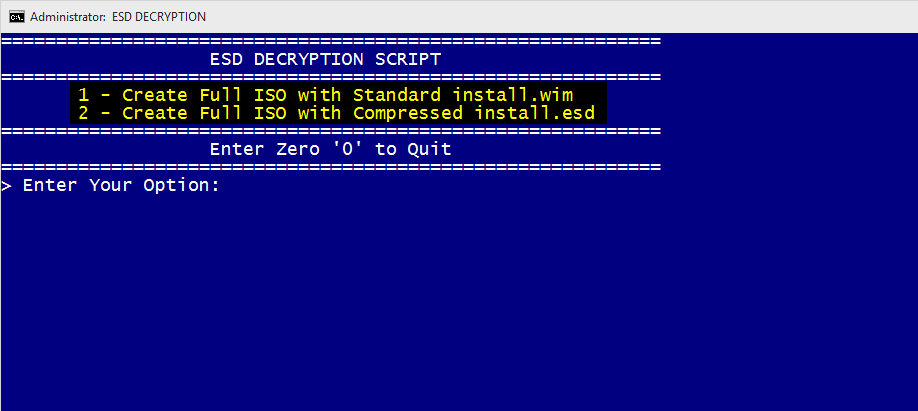
- Select the choice you want to go with.
- If you want to have a traditional ISO with install.wim file for installing windows, choose ‘1’.
- If you want to have an ISO with install.esd file for installing windows, choose ‘2’.
- Press ‘0’ to close the command options.
What difference both ISO would have is:
- Creation of ISO with install.wim would take few more minutes than what ISO with install.esd would take.
- During Windows installation using these ISO’s, the one having install.wim would take less to install windows rather than the one having install.esd in ISO.
Both ISO does the identical work of installing Windows and can be used to be burned as DVD or for making bootable USB or even mounting it virutally.
Why ISO with install.esd takes more during Windows installation, as install.esd is a compressed and encrypted file, hence Windows installer takes more time in decompressing and decrypting files from it when compared with install.wim installation time. However the time difference gap is not very big.
Also on Trouble Fixers:
But still going a traditional way always benefits more in compatibility factors in future, hence i would suggest you go to with option ‘1‘ i.e. “Create Full ISO with Standard install.wim“.
Update: ISO created with install.esd in it shall have issue with DISM tool. It shall give you “sources file not found” error. Hence choose Option 1 only.
- After choosing option, let the tool run for sometime. If it shows error of “Missing key” just ignore and continue with the process.

- ISO would be saved in same folder automatically and can take up to half an hour depending on how fast hardware you got. After ISO is built, cut and save it on your appropriate place of your backup.
Here’s a Video for you, which shall show you how the whole process goes:
link to ESD to ISO app doesn’t work any longer, do you have a new link or direct download alternative? If so, please send me a link to the address below,
Thank you,
Don