Assuming you’re working on Excel 2016, and you set the Height and Width properties of a UserForm from a program, and inside Excel, that UserForm appears shorter and narrower compared to earlier versions of Excel. You’ll notice a difference in inside height and inside width, which looks shorter and narrower, and the right side and lower end of the window are getting cut or truncated. The only good thing you see is the control layout in the main area where the UserForm would look-alike as in previous versions of Excel. Because of this issue, some parts of the UserForm or controls get truncated too. This is a known issue by Microsoft and is caused because of the difference in border size calculations between Excel 2016 and in earlier versions of Excel.
[Fix] Excel UserForm Appears Shorter and Narrower Than Previous Versions
To fix this issue, you need to set specific height and width values for the UserForm based on the Excel version you’ll be, or you’re using. If you’ve plans to use Excel 2016, that’ll require you to specify larger height and width properties in Excel 2016.
If you want to reproduce the error, so that you may make proper changes in sizes, follow below-given steps:
- Open a blank new workbook in the previous version of Excel 2016, like on Excel 2013.
- Now save this file by going to File tab, select Save As and then click Macro-Enabled Workbook (*.xlsm) in the Save As type box, type in any file name, and hit Save.
- Now, go to Developer Tab. If the Developer tab is not visible, do these steps:
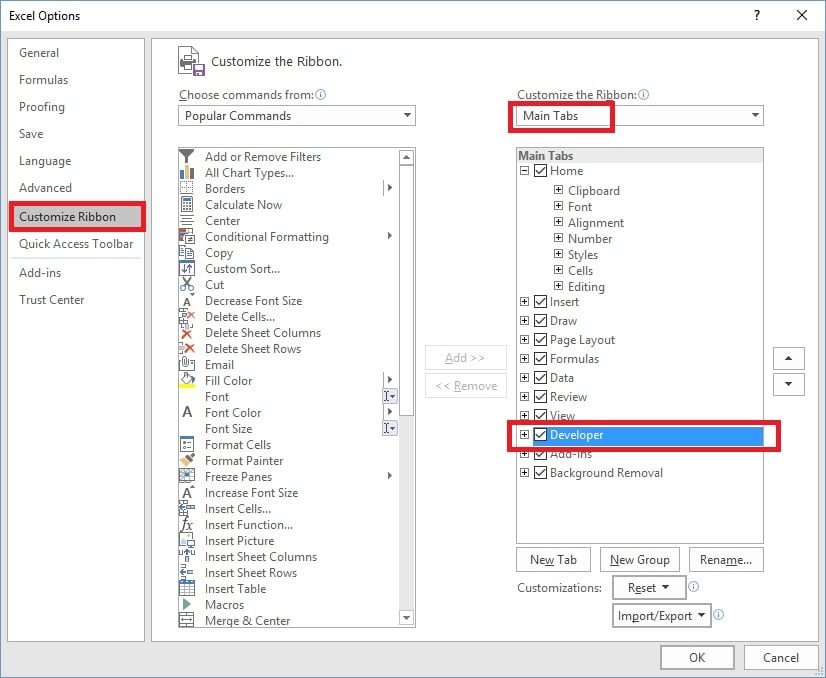
- Go to File > Options
- Click Customize Ribbons
- Under the Main Tabs area, Check the tick box of Developer.

- Hit OK to close the Excel Options dialog box.
- Now, on the Developer tab, click Visual Basic to start the Visual Basic Editor.
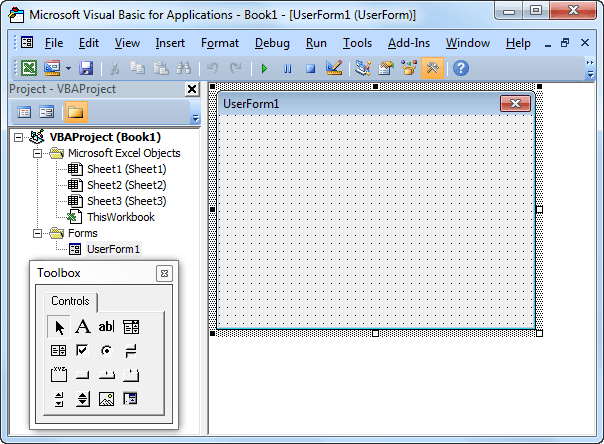
- In the Project – VBAProject pane, do a right-click to open a shortcut menu, select Insert, and then click UserForm.
- When Toolbox opens, select any control and paste it near the right and lower borders of the UserForm.
- Click the UserForm object, and then select and drag the corner mark to expand the Userform size.
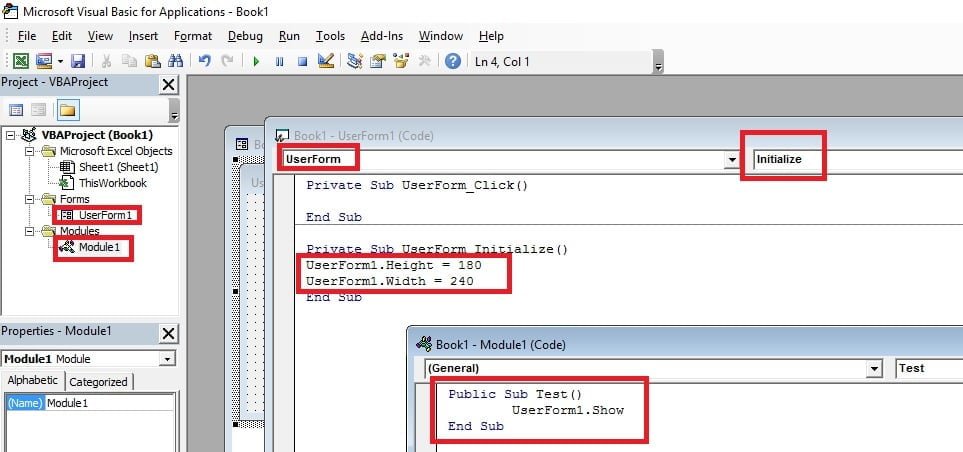
- Now, right-click on Project – VBAProject pane, right-click on UserForm1, and select View Code.
- Now follow these steps carefully:
- In the Object drop-down, select UserForm.
- In the Procedure drop-down, select Initialize.
- Add the following macro code in between the Initialize event lines:
-
12UserForm1.Height = 180UserForm1.Width = 240
- In the Project – VBAProject pane, do a right-click, select Insert, and then select Module.
- In Module1, type the following macro code:
-
123Public Sub Test()UserForm1.ShowEnd Sub

- Go back to Excel, on the Developer Tab, click Macros in the Code group.
- Then click on Test macro and then hit Run. Now, you’ll find that the control you added in Step 6 would show up correctly. Verify the size of the window to compare later.
- Save the workbook somewhere and then open the same file in Excel 2016.
- Go to Developer Tab, click Macros in the Code group and click Run.
You’ll find the error of control being truncated, which was added in Step 6. Also, the size of the window would be narrower and shorter, not like what we defined in step 9.d. Now, knowing the difference will help you make size compatible with Excel 2016 until Microsoft fixes this issue.
Thanks for the tutorial, never expected I would find the solution of same.